The instructions and screenshots below are primarily for macOS. The iOS version is very similar, so many of the instructions below will apply. An updated guide with additional iOS information is coming soon.
There are two ways to add assets to a catalog. The choice depends on whether the files are already saved to your computer and/or external drives, or if they first need to be imported from a memory card.
The catalogs created by PIXLpath only retain small reference thumbnails to your original files. If you delete the original files from your drives, PIXLpath will no longer be able to access those files.

If your files are on a memory card and require importing to a local drive, use the memory card icon located in the top-right of the sidebar.
You'll first be asked to choose the source of your import. You can add multiple sources if you have multiple cards that need importing. Next choose the destination for your import.

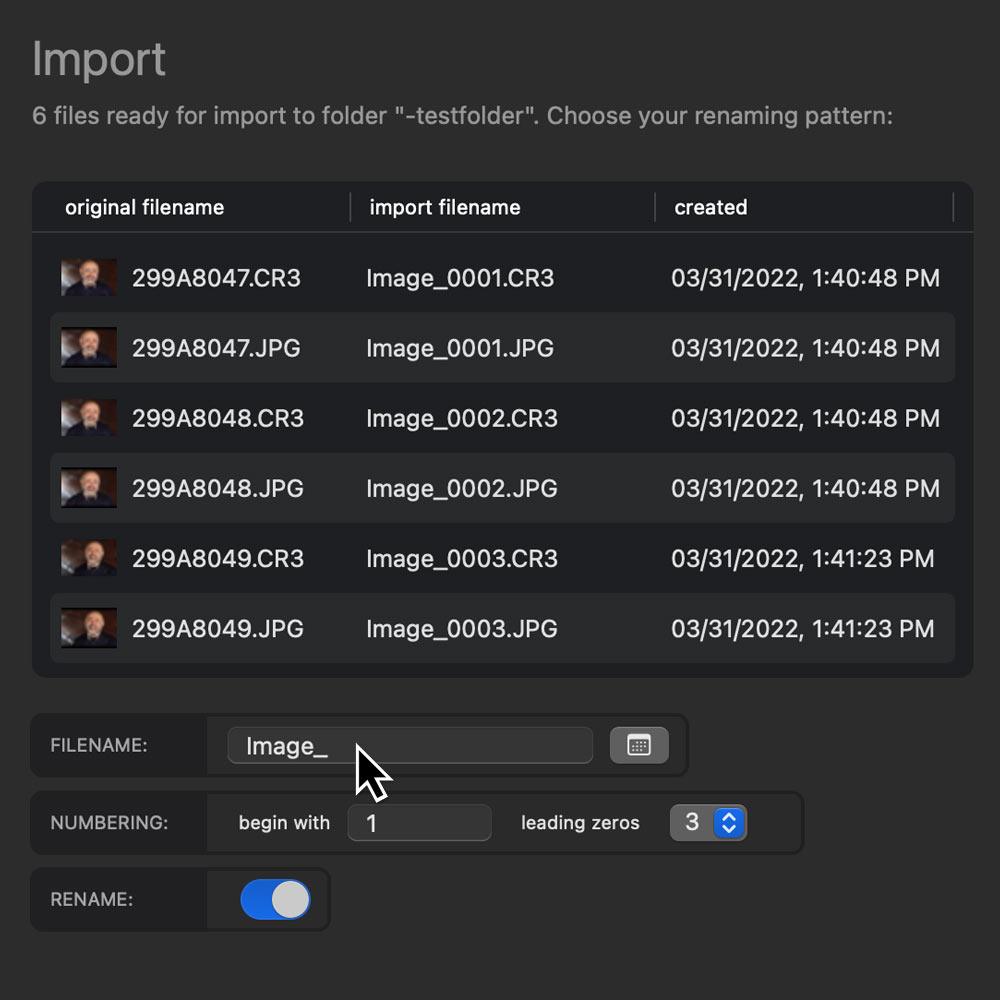
Once the source and destination are set, you will be shown a list of media files available for import in the order they were created. Select the files you wish to import from the list. To select all files, click a file in the list and then press Command + A.
If you wish to rename the files as they are imported, select the "rename" toggle switch beneath the file list.
After the import is complete, PIXLPath will generate reference thumbnails of the newly imported files.

If the files you want to reference are already saved to a local drive, use the arrow icon in the sidebar to add reference thumbnails to your catalog.
Alternatively, you can drag and drop files and folders directly from Finder into the thumbnail browser to add references and build thumbnails of the dropped files. Be sure to only do this for files that have already been imported, otherwise use the import workflow described above.
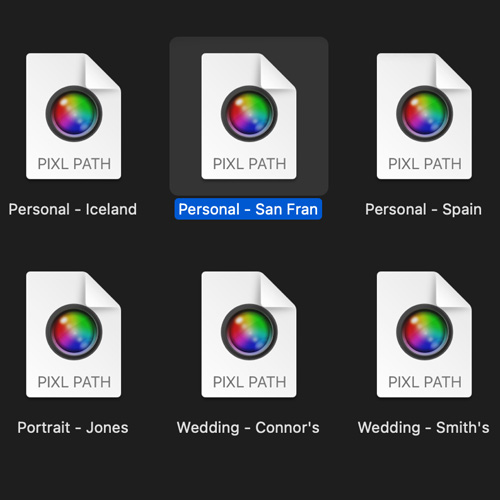
Your catalogs can be saved to disk as a .pixlpath document. This document contains previews of your assets and metadata that's created when you import & organize your assets.
A catalog, when broken apart, is essentially a folder of thumbnails and a spreadsheet of your categorizations (labels, ratings, etc). The thumbnails saved to the catalog point to the original file's location on your disk. If you remove the original file, PIXLpath will only be able to display its preview until the original file is accessible.
You can change the size and compression properties of your preview files in the app settings. By default, previews are 1,000px at their longest side. Lowering this threshold will reduce the size of a catalog at the expense of preview quality.
There are three primary views in PIXLpath: The Sidebar, Thumbnail Browser, and Enlarged View.
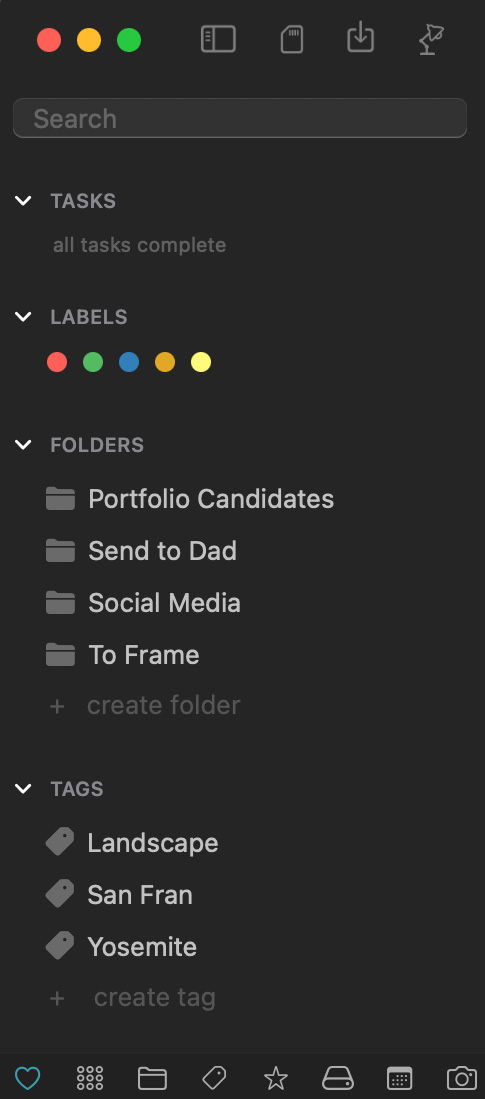
The sidebar serves as the primary tool for organizing assets into smaller collections. Some elements on the sidebar, like Folders and Tags, are created by you. Other elements, like Dates, Gear, and Drives, are created automatically based on the properties of your imported assets. Collections can be expanded and collapsed to free up screen space by clicking on the corresponding arrows to the left of the headings.
At the top of the sidebar, you will find a search field. Type text into the search field to find assets with filenames matching your text. The thumbnail browser will update as you type to show only the assets matching your search criteria.
At the base of the sidebar, you will see icons representing the various collection groups. By clicking on a corresponding collection icon, the sidebar will update to show only the items related to your selected collection. For example, if you click on the calendar icon, only dates will be shown in the sidebar. To display all elements again, click on the multi-dot icon.
The heart icon at the bottom of the sidebar represents a customizable collection view which can be adjusted in the app settings. If there are collections you will never use, they can be hidden from the sidebar entirely, thereby freeing up screen space.

-
Enlarge asset
Double-click on a thumbnail to show the full-size version of an asset. If the asset is offline, the preview version will be shown. -
Resize thumbnails
Use the + or - keys to increase or decrease the size of the thumbnails. -
Select multiple assets
Standard macOS keyboard shortcuts (shift & command modifiers) are enabled for asset selection. Either hold command while clicking on thumbnails, or hold shift while using keyboard arrow keys to select multiple assets. -
Context menu
The context menu will provide you with several actions including Open in Finder, Rename, & Share. Right click with a mouse or two finger tap on a trackpad (enable trackpad "secondary click" in System Settings / Trackpad / Secondary click / Click or Tap with Two Fingers). -
Rotate
Use the [ or ] keyboard keys to rotate an asset. This is a non-destructive action. Use an image editing application to manipulate the original file.
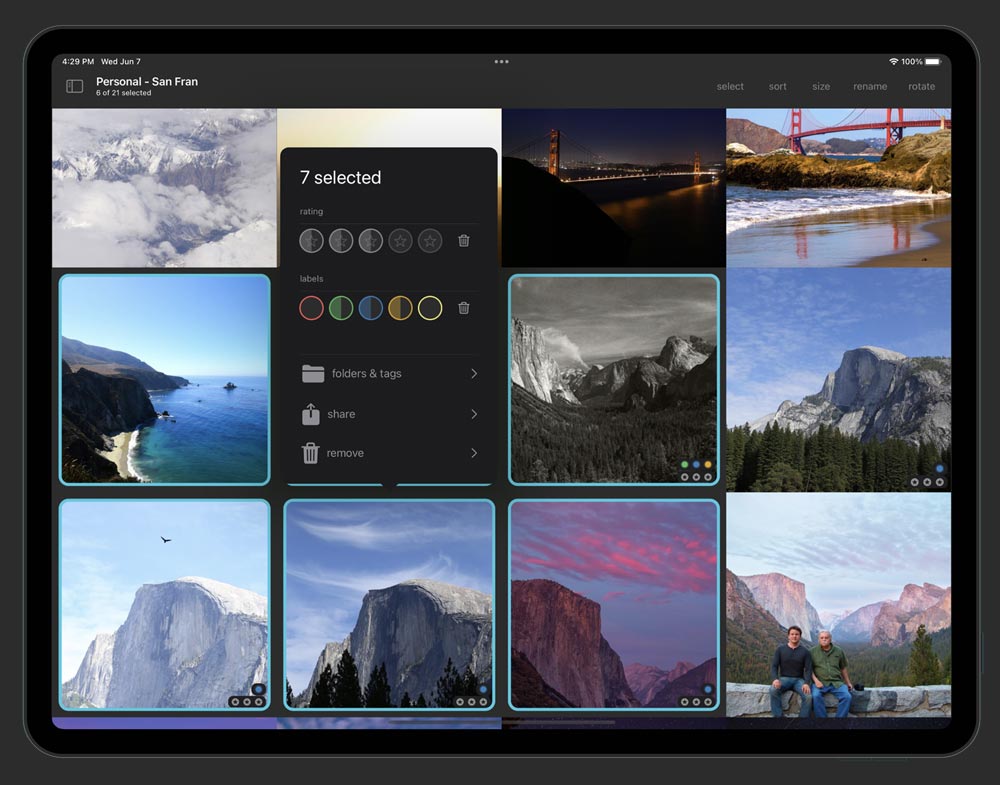
The iOS version incorporates touch gestures to accomplish selection and other actions.
-
Enlarge asset
Single tap a thumbnail to show the full-size version of an asset. If the asset is offline, the preview version will be shown. -
Resize thumbnails
Use the "size" menu item on the top-right side of the toolbar. In addition to size, you can also choose an option to "toggle frame", which will switch between showing thumbnails as squares with no spacing in-between, or with a frame and filename. -
Select multiple
Swipe from left to right across thumbnails. To deselect multiple assets, swipe from right to left across thumbnails. -
Context menu
The context menu will provide you with several actions including Label & Rating assignment, Copy, Rename, & Share. To display the context menu, long-press on a thumbnail.
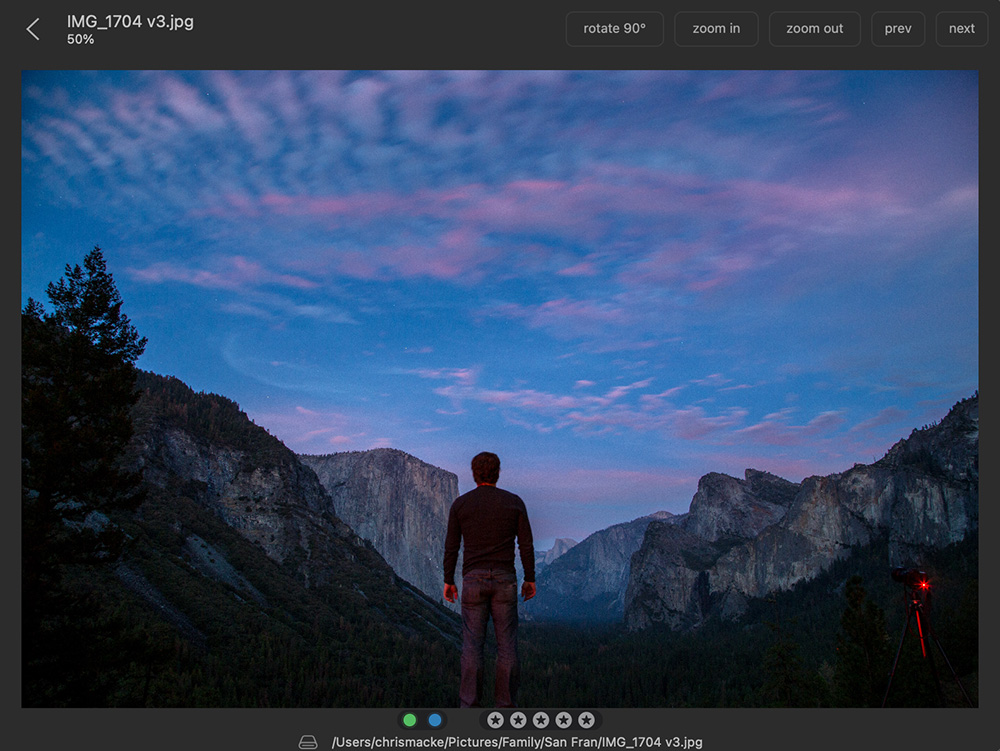
The enlarged view displays a full-size version of an asset. If an asset is offline, meaning the original drive is disconnected or the file was removed from the source location, the enlarged view will use the embedded thumbnail.
The asset filename along with the zoom percentage is displayed in the top-left of the enlarged view. The top-right of the screen displays various menu options to rotate, zoom, or navigate. The bottom of the screen displays the full save path of the asset on the left and assigned labels and ratings on the right.
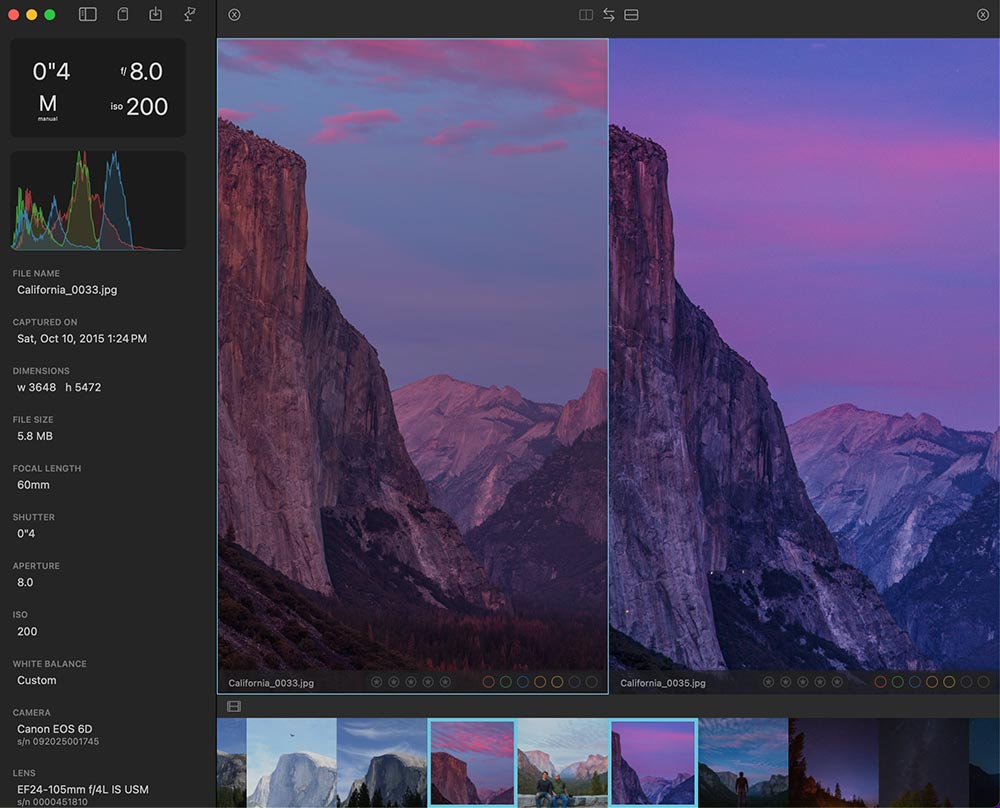
To compare images, click on the 35-mm film icon in the lower-left corner of the Enlarged View. A filmstrip will appear displaying all of your thumbnails.
To compare images in macOS, hold the command key and click on a thumbnail. The two assets will be displayed side-by-side.
To compare images in iPadOS, long press on a thumbnail.
- Trackpad: Two finger swipe, left and right, to progress to the next and previous asset.
- Trackpad: Two finger swipe up to return to thumbnail browser.
- Trackpad: Pinch to zoom on photographs.
- Trackpad: Two finger swipe to pan (when zoomed in).
- Keyboard: Right and left arrow keys to navigate to the next and previous asset.
- Keyboard: Up and down arrow keys to zoom in and zoom out of an asset.
- Keyboard: Escape to close an enlarged asset.
- Keyboard: Left and right bracket keys ( [ ] ) to rotate an asset counter-clockwise or clockwise respectively.
- Keyboard: The number keys 1-5 to assign Labels and Stars (see "Organizing Assets, Assign Assets To Labels and Ratings" below).
- Keyboard: F to display a filmstrip of all of your assets.
- Keyboard in macOS compare mode: Tab to switch which image is highlighted.
- Keyboard in macOS compare mode: Shift + Tab to swap compared image positions.
There are four primary ways to organize files: Folders, Tags, Labels, & Ratings. Folders and Tags are created by you, using a naming convention of your choice. Labels, much like those found in macOS, consist of predetermined colors. Ratings are represented by 0-5 stars. You can combine these tools to create powerful organizational strategies.
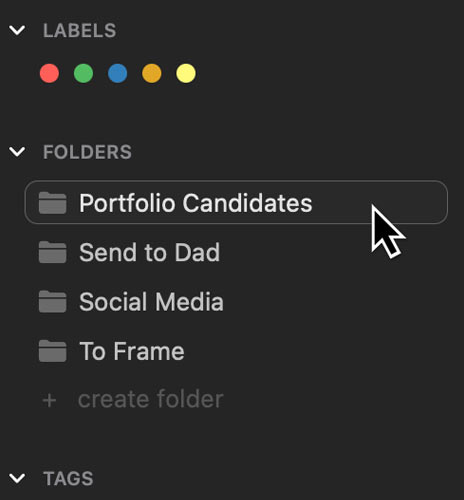
On the sidebar, you will see headings for Folders and Tags. To create a new Folder or Tag, click on the field labeled "+ create folder" or "+ create tag", type in the name you wish to use, and press return/enter. If you want to create multiple items at once, use a comma to separate each item.
To assign an asset to a Folder or Tag, select the assets in the thumbnail browser and then drag and drop them onto the Folder or Tag you wish to add them to.
On compatible Apple silicon Macs, Apple Intelligence can analyze your photos and suggest descriptive tags. Select the images you want to tag, then right-click to open the context menu and choose the tags & folders submenu. The Apple Intelligence icon appears in the top-right corner.
When analyzing your images, Apple Intelligence assigns a confidence percentage to each suggested tag. Use the percentage button to exclude tags below your preferred confidence threshold. You can also click any tag to manually include or exclude it from your results.
This feature depends on the version of Apple Intelligence included with your macOS release. As Apple updates its intelligence models, new or improved tags may become available.
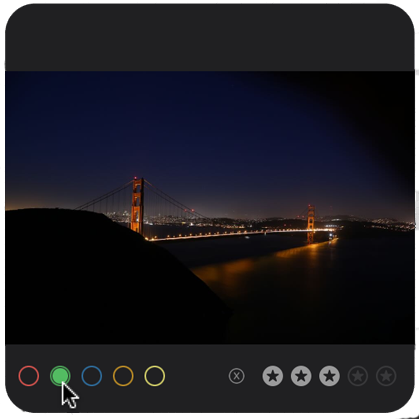
On the sidebar, you will see headings for Labels and Ratings. To assign assets to a Label, select the assets in the thumbnail browser, then drag and drop them onto color you wish to assign. To assign an asset to a Rating, select the assets in the thumbnail browser, then drag and drop them onto the number of stars you wish to assign.
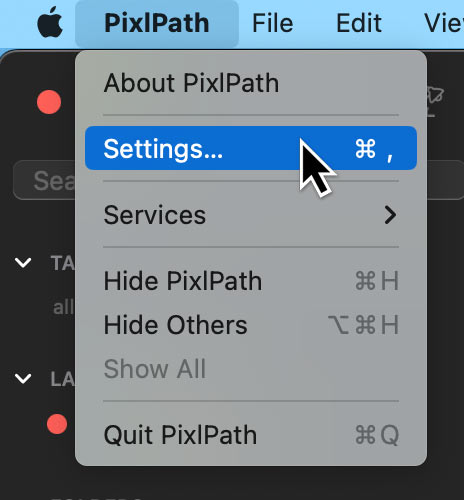
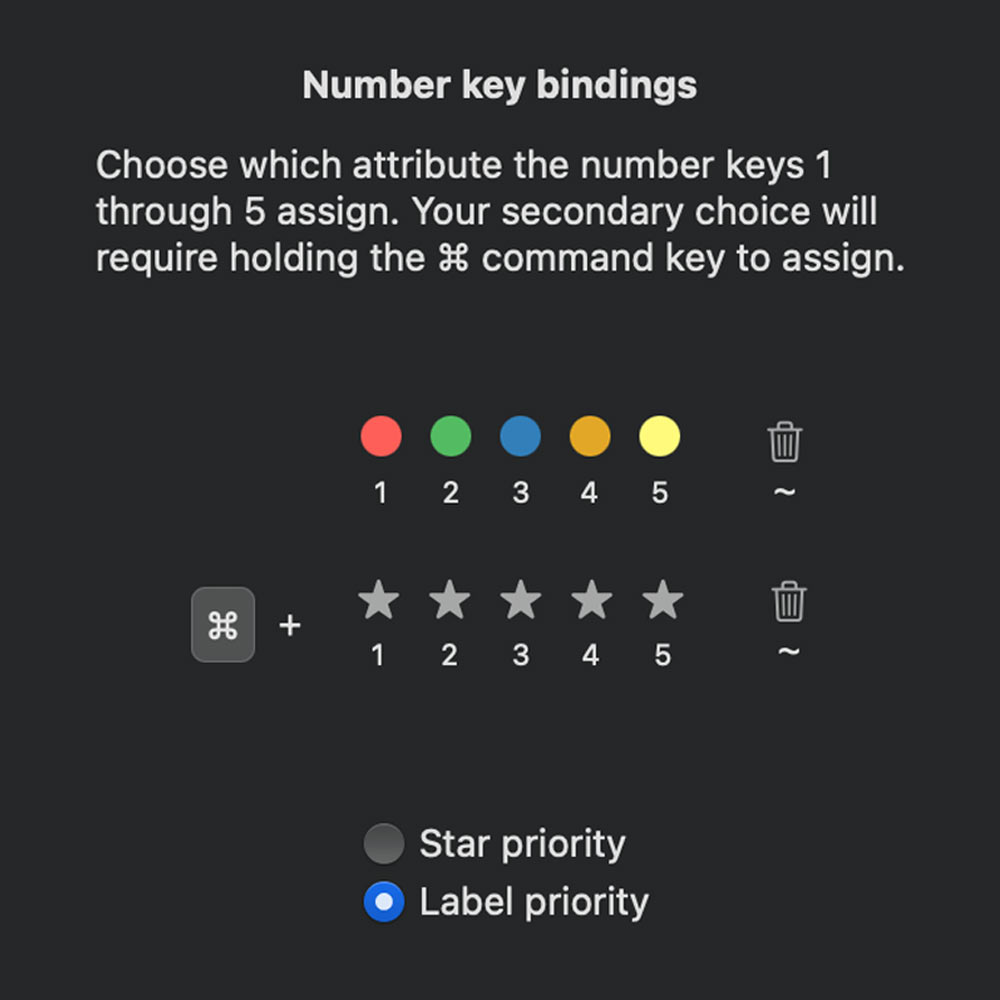
There is a shortcut for assigning Labels and Ratings with your keyboard. If you go the app settings menu (PIXLpath toolbar item, Settings...) and select the "keys" tab, you will see that the numbers 1 through 5 can be used to assign either Labels or Ratings to assets. With assets selected in the thumbnail browser, press a number between 1 and 5. The corresponding assignment will be made to the selected assets. Your secondary assignment choice will allow you to use the Command key with a corresponding number to make an assignment.
Once you've added assets to a collection, you can view the assigned assets by clicking on the collection icon in the sidebar. To deselect a collection, click the icon again to deactivate. To display assets from multiple collections at once, hold the Command key and click on the collection icons you wish to display.
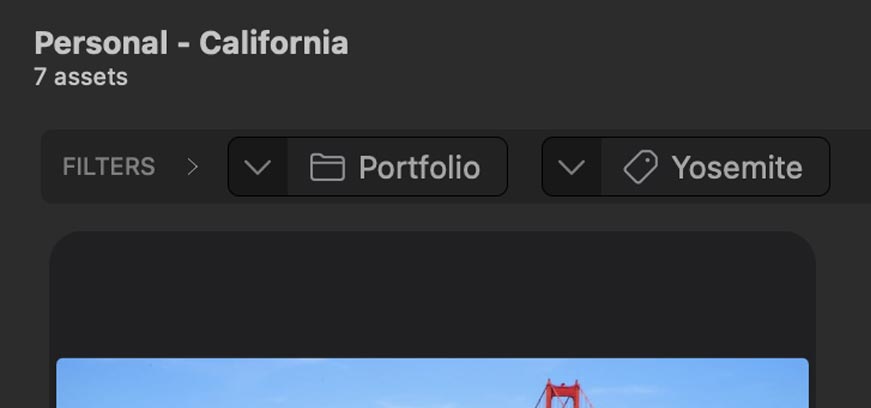
As collections are opened, representations of active collections will appear at the top of your thumbnail browser.
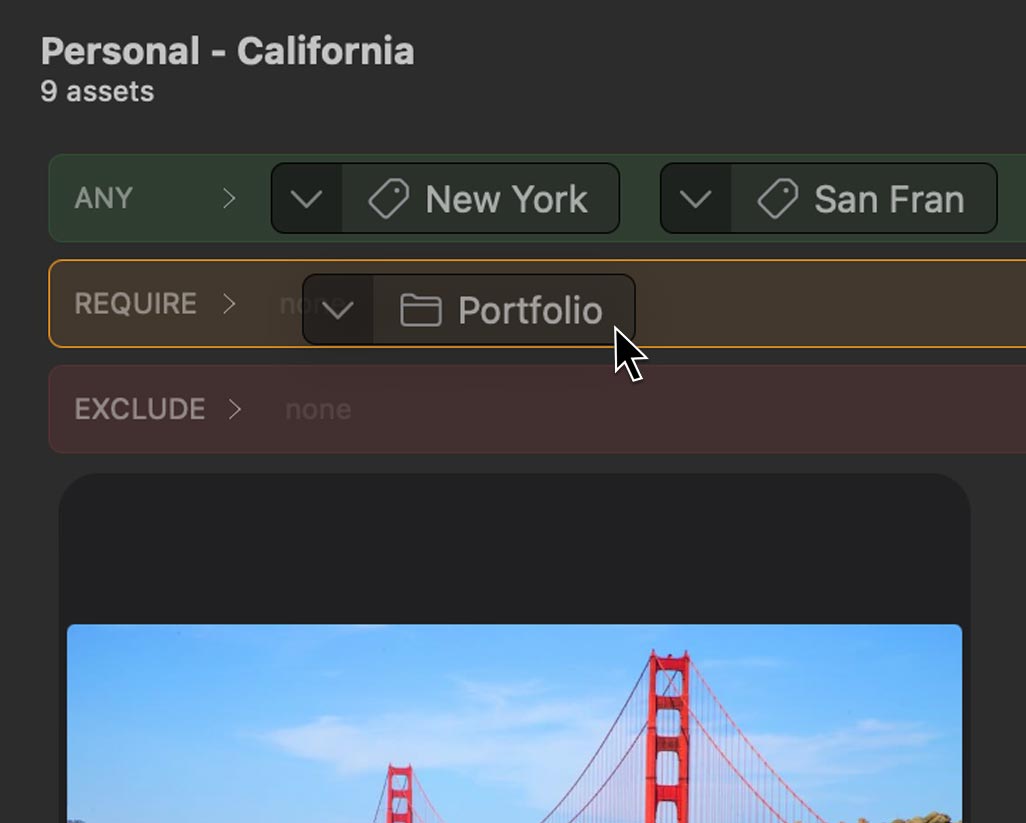
There are three conditions you can require a selected collection to meet:
- ANY: Show all assets that are members of any collection that is selected. For example, if you've selected the tags "San Francisco" and "New York", you will see any asset tagged as "San Francisco" or "New York."
- REQUIRE: Only show assets that are members of this selected collection. For example: If you select the tag "New York" as ANY and then the folder "Portfolio" as REQUIRE, you will see assets tagged as "New York" and in the folder "Portfolio."
- EXCLUDE: Hide any asset that is a member of this collection.
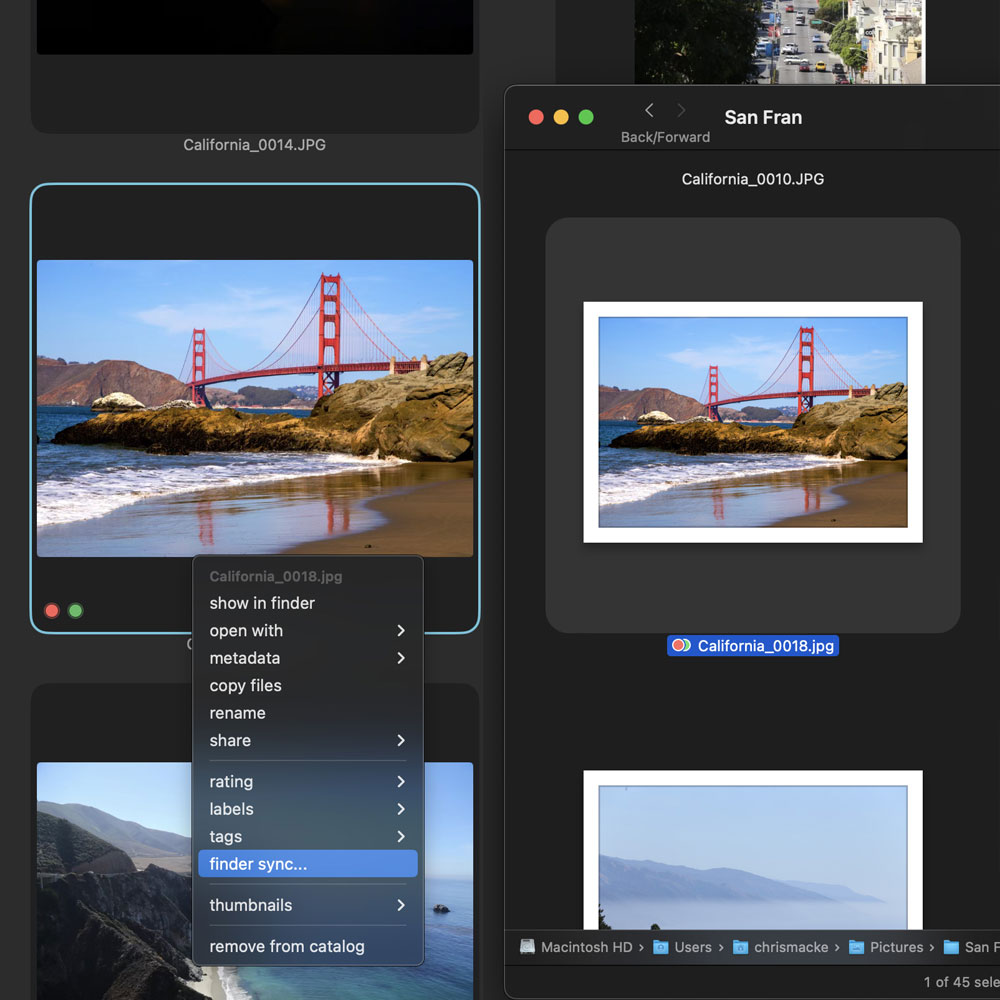
Finder and PIXLpath use similar conventions for organizing files. When you right-click on files in Finder, you can assign a set of color-coded circles, which Finder calls tags. Custom named tags can also be created in Finder to apply to files.
You can also assign color-coded circles to items in PIXLpath, but we refer to these simply as labels. We also have custom named tags.
A tool is available within PIXLpath to sync your internal catalog categorizations with Finder's tags. The sync tool will automatically convert Finder's color-coded tags to labels in PIXLpath and vice versa.
To sync properties to and from Finder, select the thumbnails you wish to sync and then right-click to reveal the context menu. Select the "finder sync..." option to reveal the sync tool
There are a few options available in the sync tool:
- Merge All: All catalog values will be added to existing Finder values and all Finder values will be added to existing catalog values.
- Merge to Catalog: Values from Finder will be sent to the catalog and merged with its existing values. No values will be sent to Finder.
- Merge to Finder: Values from the catalog will be sent to Finder and merged with its existing values. No values will be sent to catalog.
- Overwrite Finder values with Catalog: Values from the catalog will replace all existing values in Finder.
- Overwrite Catalog values with Finder: Values from Finder will replace all existing label & tag values in catalog.
This tool can be useful if you would like for your categorizations to extend beyond PIXLpath and integrate them into macOS features like Spotlight.
PIXLpath offers file rename and copy functionality. These functions affect the original source files, so the files must be online to use these features.
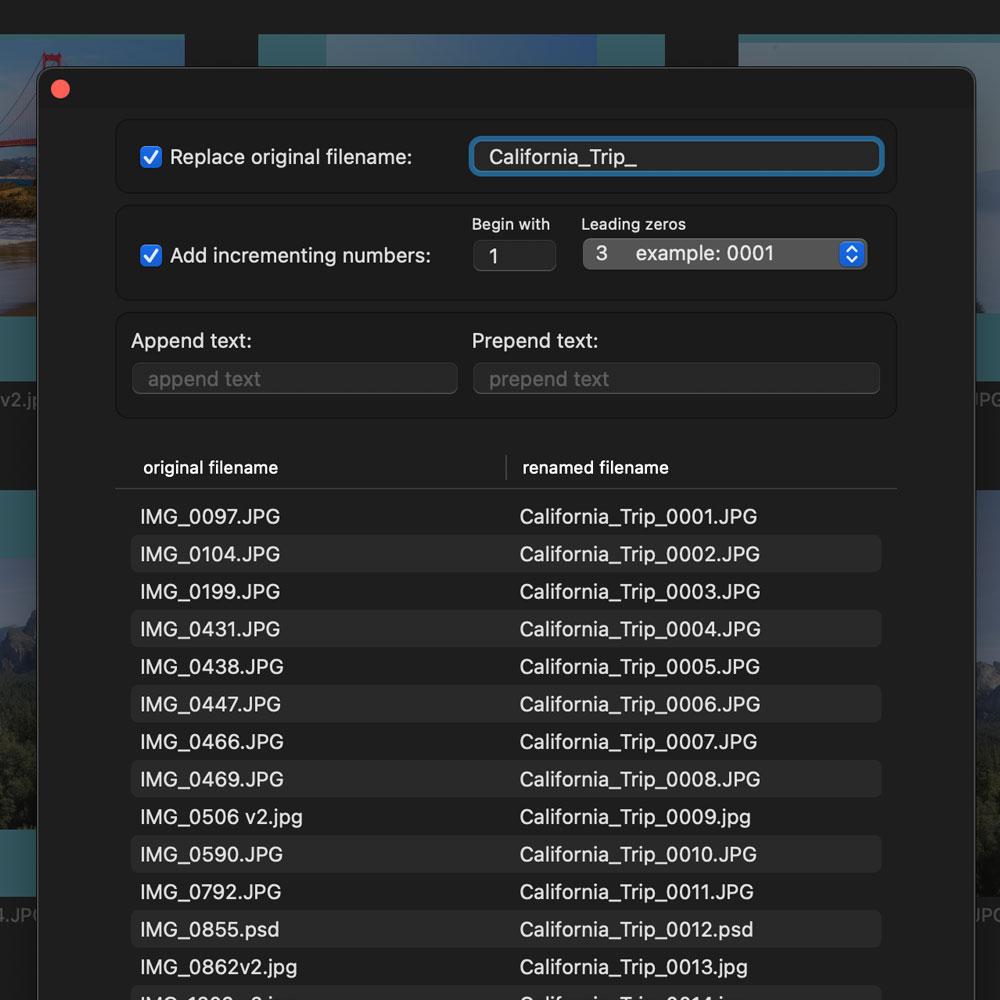
To perform a batch rename, select the files you wish to rename in the thumbnail browser. Once selected, choose the "rename" menu item in the toolbar, or right click to reveal the context menu and select "rename." Once a new naming convention is chosen, a live preview of your modified filenames will be displayed alongside the original filenames. PIXLpath will check for naming conflicts to assure overwrites do not occur. Click on "perform batch rename" to complete the batch rename.
When assets are added to a catalog, you will see their location in the sidebar under the Drives heading. A utility is available to sync your catalog with the source location of your assets. Right-click on the folder you wish to sync and click on the "sync with disk" option.
A window will appear and display a list of files that will be added to the catalog, removed from the catalog, have its location on disk updated (you moved it in Finder to a new location on the same disk), or have its name changed (you've renamed it on disk).
Two icons appear to the right of the source drive.
- Include Subfolders: In addition to checking the folder you've selected, PIXLpath can also check all of its subfolders. This is a potentially time-consuming operation depending on the number of folders and files in the selected location.
- Make Auto-sync Folder: This option will create a background process which will run after the initial sync and perform catalog updates automatically every time a change is detected on disk. It's recommend not to use this feature until you are familiar with the sync process.
Important: If sync detects a file is missing from the source location, it will be removed from the catalog. This will also remove any associated metadata, labels, ratings, etc., from the catalog.
Sync can detect if you have moved a file via Finder to a new location on the same disk and can update its location in the catalog. Sync can not detect if you've copied the files (copy & paste / drag & drop) to a new location or a different disk. Files copied or moved to a different disk are seen as missing and will be removed from the catalog along with their associated metadata.
Be sure to back up important catalogs before using auto-sync.
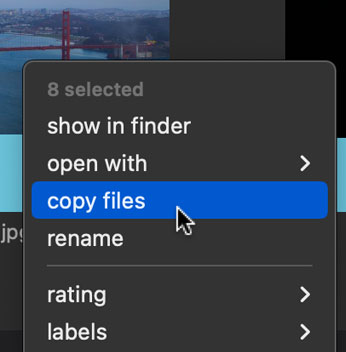
To copy files, select the files you wish to copy in the thumbnail browser. Once selected, right click on one of the selected assets to reveal the context menu. Choose the "copy" option in the menu. The next window will ask for a destination for the copied files.
The copy window can be minimized while the task is in progress. You can bring back the copy window at any time by clicking on the copy progress bar located in the tasks section of the sidebar.
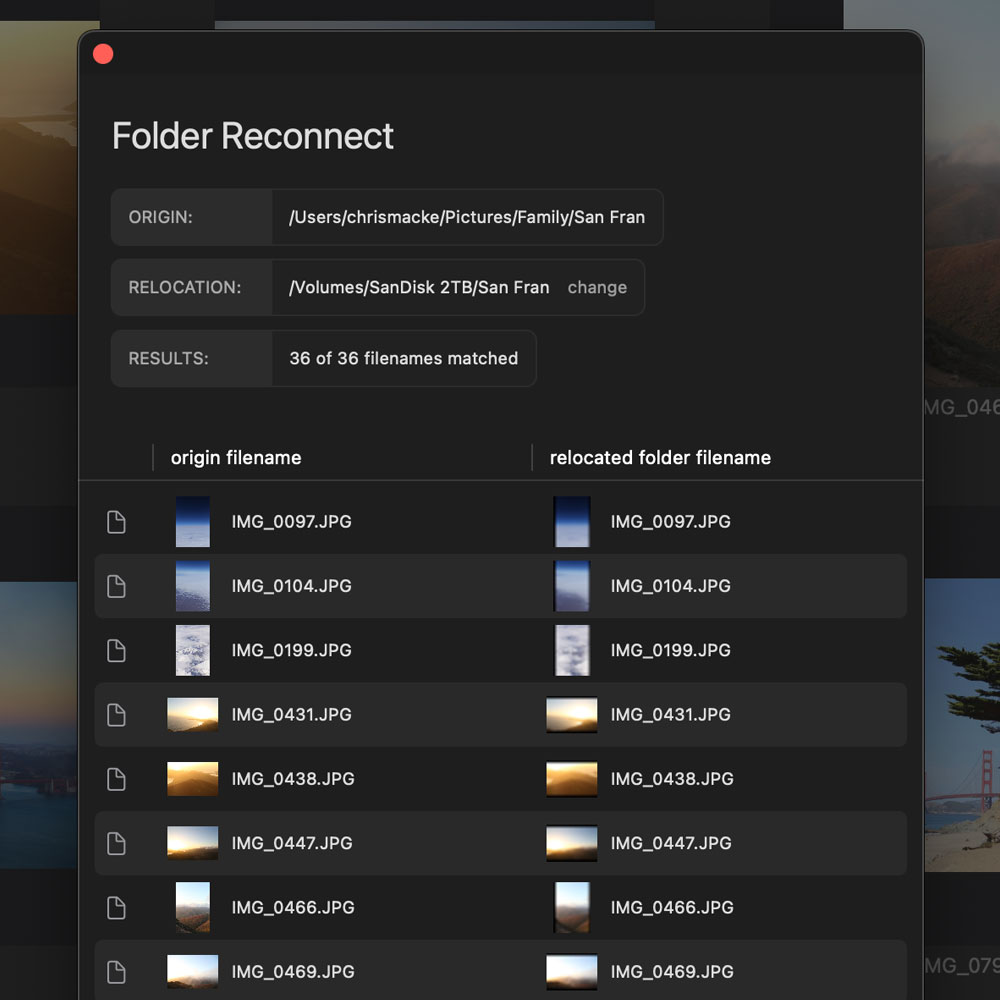
If a folder has moved to a new location, PIXLpath may be able to reconnect the contained files. In the sidebar, scroll to the Drives header. Collapse the relevant drive folders until you reach the original location of the folder you wish to reconnect. Right-click on the folder and select "change asset locations." Navigate your system folders and select the relocated folder. PIXLpath will display a list of filenames from the relocated folder that match the offline folder. Matching is performed solely by filename, so be sure to compare the provided previews to ensure the files are the same.

 Thumbnail Browser
|
|
|---|---|
⌘ A | Select all assets. |
⌘ D | Deselect all assets. |
↑ | Select asset one row up from current selection. |
↓ | Select asset one row down from current selection. |
← | Select asset preceding current selection. |
→ | Select asset succeeding current selection. |
shift → | Add succeeding asset to selected asset group. |
shift ← | Add preceding asset to selected asset group. |
return | Enlarge currently selected asset. |
[ | Rotate selected assets counterclockwise. |
] | Rotate selected assets clockwise. |
|
0 1 2 3 4 5
|
Assign ratings or labels depending on the preference you set in the app settings.
The action you assign as secondary will require holding ⌘ to execute.
|
⌘ ↑ | Page up. |
⌘ ↓ | Page down. |
⌘ ← | Scroll to top of gallery. |
⌘ → | Scroll to bottom of gallery. |
| Mac Thumbnail Browser | |
+ | Increase size of thumbnails. |
- | Decrease size of thumbnails. |
⌘ R | Rebuild selected thumbnails. |
⌥ click | Folder auto expand/collapse all subfolders. |
|
Enlarged View
|
|
|---|---|
→ | Display next asset in catalog. |
← | Display previous asset in catalog. |
esc | Return to thumbnail browser. |
F | Display filmstrip to change or compare assets. |
[ | Rotate asset counterclockwise. |
] | Rotate asset clockwise. |
|
0 1 2 3 4 5
|
Assign ratings or labels depending on the preference you set in the app settings.
The action you assign as secondary will require holding ⌘ to execute.
|
| Mac Enlarged View | |
↑ | Zoom in on image. |
↓ | Zoom out of image. |
+ | Zoom in on image. |
- | Zoom out of image. |
Tab | Change highlighted asset in compare mode. |
Shift Tab | Swap positions of assets in compare mode. |
-
iOS Touch Gestures
Thumbnail Browser
One finger single tap Enlarge asset. One finger long press Display context menu. Two finger single tap Display context menu or select asset. Customizable in settings. Continuous swipe Swipe left to right to select multiple assets, right to left to deselect.
Enlarged View
Pinch Zoom in/out on image. Swipe left & right Swipe left to display next asset, swipe right for previous asset. Swipe up & down Swipe up or down to return to thumbnail view.